 Author: Cassie Stevens
Visit Mrs. Stevens Bakery on Facebook if you are interested in a custom cakes for your special occasions.

Author: Cassie Stevens
Visit Mrs. Stevens Bakery on Facebook if you are interested in a custom cakes for your special occasions.
Author Cassie Stevens


 Visit Mrs. Stevens Bakery on Facebook if interested in a custom cake for your special occasion.
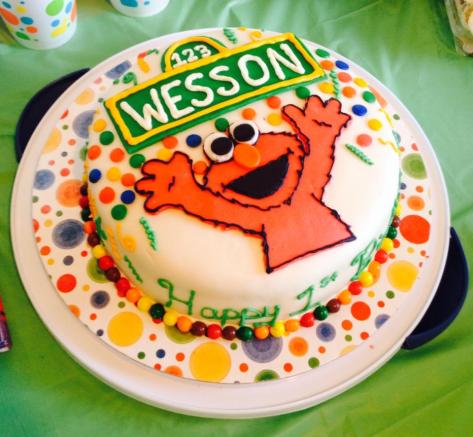
Wesson’s Elmo 1st Birthday Cake
Author: Cassie Stevens


 Visit Mrs. Stevens Bakery on Facebook if you are interested in a custom cake for your special occasion
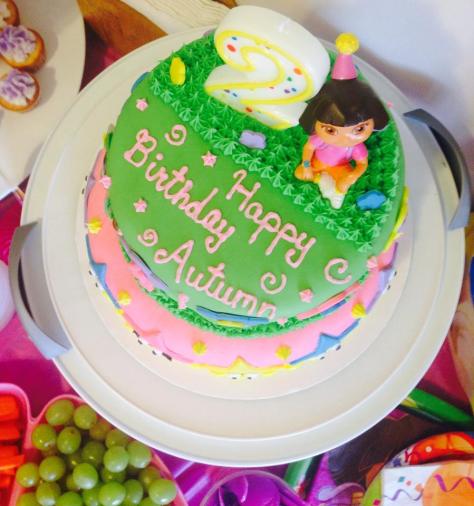
Autumn’s Dora the Explorer 2nd Birthday Cake
 Author Cassie Stevens


 Visit Mrs. Stevens Bakery on Facebook if you are interested in a custom cake for your special occasion
Cora’s My Neighbor Totoro 2nd Birthday Cake

Author: Cassie Stevens
I love how a good idea can consume me and keep me busy for days. I am a very creative, artsy kind of person and lately my outlet has been cakes. I am learning how to use all my new fondant tools, so practice makes perfect. This cake I wanted to try fondant flowers on for size. They say you are your own worst critic, and I can see all the flaws and how it could be better but these are the first three flowers I have ever made and they were cake worthy, so I had to use them.
 Now, I know the petals still look a little thick, but I’ll get there. I think I did pretty good! 🙂
This is a red velvet cake on top and a chocolate devils food cake on the bottom with a marshmallow fondant shell and buttercream icing. Very delicious! So naturally I posted it up on my Facebook page to show it off. My Aunt seen it and wanted to send a cake just like it to her step-daughter Tiffany who has a Valentines Birthday (how cool is that).
I gratefully accepted the opportunity and looked forward to learning how I would ship a cake Via mail through a few states without ruining my work. So I made another cake just like it (a little different).
 They both were very fun to make. This one went very fast though (because I knew what I was doing already).
So I boxed it up in a cake box, then reinforced it the best I could so it wouldn’t move.
 The cake board was hot glued in place in the box and the cake itself was stuck with icing onto the cake board. Then this box was closed up and placed inside of another box and cushioned with about a billion tied up plastic shopping bags to cushion the box inside.
There was a note:
 Awww……how nice!
I loved it simple and perfect.
I shipped the cake 2 day USPS as fragile and it arrived in perfect condition she said and of course she loved it. Tiffany told my Aunt that she was throwing out all the other cakes she got for her birthday and keeping this one. It was the best! YAY! Sucess ❤ it!
Nailed it! Now, I have some experience shipping cakes. I can’t wait to open my bakery!

This morning my girls (very adorably) demanded pancakes for breakfast. So I took out my trusty pancake recipe and started mixing.
Problem. I used baking SODA instead of baking POWDER. But then, I added the baking powder, and, oh my goodness… I tried one pancake and it didn’t work. It just fell apart all over the place. It also tasted like baking soda. Blech!
Here’s something you probably already know about me by reading my posts; I can’t waste anything – especially food. So I tried to salvage it. I thought it probably wouldn’t work, but I had already messed it up, so what the heck, right? To my left was a baggie of ready-made oatmeal – my version of the instant packages. It had oats and raisins, some sea salt, and cinnamon/nutmeg. I keep these made up and ready for my husband to grab in the mornings. All he has to do is add a cup of water to quickly make a healthy breakfast for the girls. I poured that in the mix. Then I wanted something else. I couldn’t put my finger on it! Looking in the fridge I saw some apple butter looking kinda lonely. I chucked it in, stirred it up, and hoped for the best.
40 Minutes later…
 ::Pen Pals and Cookin' Gals Blog") Well, hey, it worked! I made a beautiful little breakfast cake! It’s also pretty healthy. Yay!
Well, hey, it worked! I made a beautiful little breakfast cake! It’s also pretty healthy. Yay!
Without further adieu…
 ::Pen Pals and Cookin' Gals Blog")
Mistake Cake (or Everything-But-the-Kitchen-Sink Breakfast Cake)
Ingredients:
2 Cup spelt flour
1 Cup rolled oats
2-4 Tblsp coconut sugar (depending on your sweetness preference)
1 tsp nutmeg and/or cinnamon
4 tsp baking powder
1 tsp baking soda
1 tsp sea salt
2 Cup whole milk
1 Cup applesauce (I used apple butter!)
4 Tblsp melted butter
2 Tblsp melted coconut oil
2 large eggs
1 Cup raisins or other favorite dried fruit (optional)
Directions:
Mix everything together however you want with a mixer. It doesn’t really matter what order because I totally “invented” this by messing it up. Pour into a well-greased pan.* Bake at 350 degrees F for 30-40 minutes, until a toothpick comes out clean.
Mine was an oval pan. You can use this handy conversion chart to check the time for your pan. The chart works well for this cake. Want to make a heart-shaped Mistake Cake? Go for it!
Have fun!
Love, Veronica
 Author: Cassie Stevens
I had a lot of fun with this project..it consumed me for three days. I have a one year old daughter so EVERYTHING takes longer (not complaining). On day one I made the fondant. This is the first time I have ever made it myself. I had worked with fondant before, but it always came in the store already on the cake then I decorated it. I was a little nervous about making my own fondant because I have seen how it can tear apart so easily. I did a ton of research on the internet, watching video tutorials, reading recipes, and tips on making and working with fondant. Now, after making this recipe I can honestly say fondant is not hard at all. I had nothing to be nervous about. This recipe is my new favorite go-to fondant recipe, and it was very tasty too. I had heard quite a few times that store bought fondant was very yucky (except Duff’s of course). So I set out on the quest to make an conquer my own.
I have recently been given a large collection of cake decorating supplies by a very kind Aunt of mine. She had taken a cake decorating class and gave me everything including the course books. Well, she couldn’t have given it all to a better person. I have been using everything since I received it all. I keep going through all the stuff and find myself saying “Man! I have everything, how nice”. I came across a hand written marshmallow fondant recipe in her book that was very similar to those that I found on the internets, and this is what worked for me.
Marshmallow Fondant Recipe
16 ounces mini marshmallows
4 Tbsp water
1 Tbsp vanilla extract
2 lbs confectioners sugar
I put the marshmallows in a microwave safe container and heated them for about two minutes or more, just until they are puffed and melted. Grease a wooden spoon, add vanilla, water, and half of the sugar and mix well. Mixture will start to harden as you mix and add more sugar. You want to mix well before you add more sugar you want it to become a stiff ball, then turn it out onto a greased and powder sugared surface (not too much grease). Grease your hands. Knead and work in the remaining sugar. Your consistency should be pliable without tearing or sticking to anything ( it’s easier than it seams trust me). When rolling out fondant; sprinkle surface with powdered sugar so it doesn’t stick.
Fondant is very versatile, it can be molded and shaped or it can be rolled and cut. It is almost like play-doh. I really enjoyed working with it. It really brought out the artistic side of myself that I haven’ t seen or felt in a while. Next, I dyed the fondant several different colors; red, blue, green, yellow, orange, black, and I left the rest white. I used Wilton’s cake decorating gel colorings. I also made sure I used gloves when mixing the dye (so my hands wouldn’t stain) and change gloves with each new color. That was all I could get done on day one. I felt accomplished after conquering my new feat. I was very excited and couldn’t wait to start on the project again the next day. Now, it’s family time. Daddy’s home. Time to play! Time for dinner, bath time, play time, then bed time, and everything else in between in our routine of things every night. Tomorrow is another day..
 Cookie Monster Cupcakes
YAY! I’m so ready for day two, I dreamt of Elmo dancing and singing in my head. The fun has begun. Time to roll out and cut out Elmo. I did a quick sketch up of the cake layouts before I started the project and it was approved. So, I already had a print out I found off the internets that I really liked and re-sized it so it would fit on the cake appropriately. I sprinkled powdered sugar over the top of the fondant so the paper wouldn’t stick and cut out Elmo. Then cut out the white and black for his eyes and mouth, and an orange oval for his nose. Elmo is a very easy character to make. I set the assembled and outlined in black Elmo on a sheet pan lined with parchment.
The Sesame Street sign was next. I did that all freehand. No stencils on that one. Easy, again. I did Wesson’s name and the yellow outline in icing. So, I just set the green fondant sign on the sheet pan with the rest of the pieces ready for assembly. I placed all that stuff in the fridge for a while to harden up. Fondant will soften as you work with it (the warmer it gets). Next was baking the cakes. Red Velvet. I cheated and used a box cake mix. Don’t judge me, it was faster. If I had the time I would have. I recently made an awesome red velvet cake from scratch for another friends birthday party. I really liked that recipe too, but that’s another blog post (when I have the time). LOL
I made a two layer cake a smash cake and about 36 cupcakes. Whew…time to let them cool…
 Elmo Cupcakes too!
After the cakes cooled it was time for assembly. I iced the cake and rolled out the fondant about a quarter of an inch thick . I then draped it over the cake and pressed it all around the edges. Cut off the excess, then assembled all the rest of the cake. One cake done.
Time to get started on the cupcakes. Did I mention I really enjoyed this project? Ha ha. Even though my hand kept wanting to give out from all the piping I did, I had a lot of fun with everything. I did cookie monster first. Added the googly eyes and the half a cookie, or in some cases just some crumbs. I ran out of store bought eyes after about ten cupcakes. So I decided to try to make my own. I rolled out the white fondant and cut out little eyes with the back of a large icing tip, then piped the black on the eyes. Easy, again.
Time for Elmo cupcakes! YAY! The whole time I was singing with my daughter the theme song to Elmo’s world, and of course it got stuck in my head. Then I begun to despise the stupid song, as much as I love Elmo and all, anything on repeat can get annoying. Ha ha.
I started with the black smile directly on the cupcake, then I piped around the rest of the cupcake to make his fur. I added the fondant eyes, and piped the nose on with orange icing I mixed up. The cupcakes are done Whew…Now it’s family time. Daddy’s home. Time to play. Time for dinner, bath time, play time, then bed time, and everything else in between in our routine of things every night. Tomorrow is another day.. I will finish the smash cake.
The day of the party! Crunch day…Time to go over everything and make sure it was all up to my standards. The party wasn’t going to start until the afternoon so, I still had plenty of time to finish the little smash cake. I Iced it with buttercream icing, then decorated it with a face of Elmo. Very cute! YAY! All done.
 The Birthday Boy and his Momma! Precious moments….
I spent the next hour and a half making an Elmo face card cut out of construction paper, with a written excerpt from Mamma’s favorite children’s book.
Baby’s got eyes, ears, and a nose…
A tummy and legs and ten little toes…
Oh, what a sweet baby!
Good enough to eat baby…
Sweep me off my feet baby…
❤ it!
 Smash Cake… it got smashed pretty bad.
Author: Veronica Hilliard
 If you’ve been following our blog, you know that we’re on a quest to find the perfect thing to do with the almond meal that is left over after making homemade almond milk. We’ve had a few ideas thrown in the mix; and my cousin made some super almond cookies!
Yesterday, I needed a recipe for something to bring to church for an activity. I was in the mood to try something totally new. After searching Pinterest for “Cake”, I found this recipe for a beautiful Almond Buttermilk Cake. I had (nearly) all the ingredients, so I thought I’d give it a try. I was not disappointed!

Butter and sugar creamed together. Yum. This is one thing I have a hard time not stealing a spoonful of. Don’t judge me. I don’t actually do it!
Also, don’t judge my scratched up bowl. I have a toddler who thinks pretending to cook with a metal spoon in my metal bowl is fun. I let her, because sometimes the sound of metal scraping metal is better than the alternative. Those of you without kids yet, don’t say I didn’t warn you! 😉
 Add the egg, almond extract, and your lemon zest, or in my case, grapefruit zest. Why do I never have lemons? And a word to the wise; do NOT lick the almond extract spoon. It’s like licking moonshine, but worse. I think I burned my tastebuds. Don’t do it.
 Mix again. This recipe requires you to mix at nearly every step. I used my handy stick blender with the whisk attachment. I love that thing.
Then you add the buttermilk and flour a little at a time while mixing. I don’t use buttermilk often enough, so I keep powdered buttermilk in my fridge. It stays fresh for 2 or 3 years. 4 tablespoons of powder in 1 cup of water makes 1 cup of buttermilk. I just add the powdered buttermilk to the dry ingredients, and I cut the amount of water a couple of tablespoons.
The original recipe called for regular flour. The reason I chose this recipe is because I wanted to see how the almond meal/flour would hold up in it. I used 1 cup of almond flour and it seemed a little more wet than I thought it should be. So I added 3 tablespoons of flour to help bulk it up. I didn’t want it to be a sloppy mess due to the almond flour.

Before baking…
I added some sliced almonds and coarse sugar to the top before baking. It really brings it to the next level so that you get bits of crunchy sugar and toasted almonds in each bite. Don’t skip this step! It’s really worth it. I didn’t get a picture of the before with almonds and sugar. My hubs came home from work, and I got a bit sidetracked. At this time in my life, talking to another adult trumps my passion for food. Believe it.
 And after baking…
The verdict? It’s really, really good! Not flaky like a cake – more fudgy, like a brownie. It reminded me of kransekake a little bit. At our church activity we had it with ice cream. That brought it to WOW status. Really tasty. I will be making this one again. I think next time I’ll add a lemony frosting drizzle to make it even more like kransekake.
Recipe for Almond Buttermilk Cake using Almond Meal
Ingredients:
Alternate garnish: Lemon Icing
Directions:
Serves 6
Nutritional Information (per serving, without icing):
Calories: 346, Fat: 20 g, Saturated Fat: 5 g, Sodium: 360 mg, Carbohydrate: 32 g, Protein: 8 g
Are you ready to try something new? Tell me what you think of it!
